30 Days Of Using The PocketPCR Portable Thermocycler
As most people know, I have long covid, and have had it for almost three years now. During those three years, I have watched much of the research with hope, but ongoing disappointment. The recent Recover TLC conference that was happening over the last few days mostly showed that they are still working on the plan to get to the plan, and many of the trials they envisioned last haven't even hit the recruiting phase yet. In short, in almost seven years nothing really has been produced despite over a billion dollars of funding.
Like other patients, I've sort of been forced to fend for myself. I spend most of my time at home, avoiding PEM crashes as best I can, which I usually can't. The first year was pure hell and I spent most of it on the couch at my sister's house in Canada. I got so bad at one point my sister was debating taking a year off work just to help me. Thankfully over the last few years my brain has slowly rebooted, even if my physical limitations are greater. As a result, I often find myself bored, so I tend to occupy most of my time at home by tinkering with hobbies or doing whatever research I can.
I decided months ago to try and teach myself molecular biology, and have also been bio-banking a lot of my own samples with the goal of processing them myself. Short of an actual test that shows I have ongoing covid replication in my blood, I have pretty much every possible tangential indication of viral persistence such as increasing antibodies for covid over time, high cytokines for three years, exhausted covid-specific CD8 cells, occasional IgM positivity for Sars-Covid-2, etc. I am hoping some of my banked samples can be used at some point in the future to do a retroactive assessment of my state over time, as I have serum, stool, plasma, and preserved RNA/DNA for nearly six months now.
Searching For the Spike
One of the things I decided to do is to try and find evidence of an active viral infection in one of my samples. There aren't really any commercial tests available for this, and only one or two research based ones. One of the problems is that covid, especially in the post-acute phase, doesn't seem to really lounge around out in the open. It seems pretty clear from the research to date that it's living in some tissues like the gut, and I suspect other immune privileged sites like the CNS. That said, I have six weeks of banked samples from when my IgM for covid went positive, which usually indicates an active infection, so I do have a reasonable shot at finding it in blood or stool I think.
My rough plan before starting was to build a mini molecular biology lab and eventually try and do PCR (Polymerase chain reaction) to see if I can find RNA encoding spike, nucleocapsid, and hopefully sgRNAs which would indicate active replication. That's been my north star, and I've been slowly working towards it.
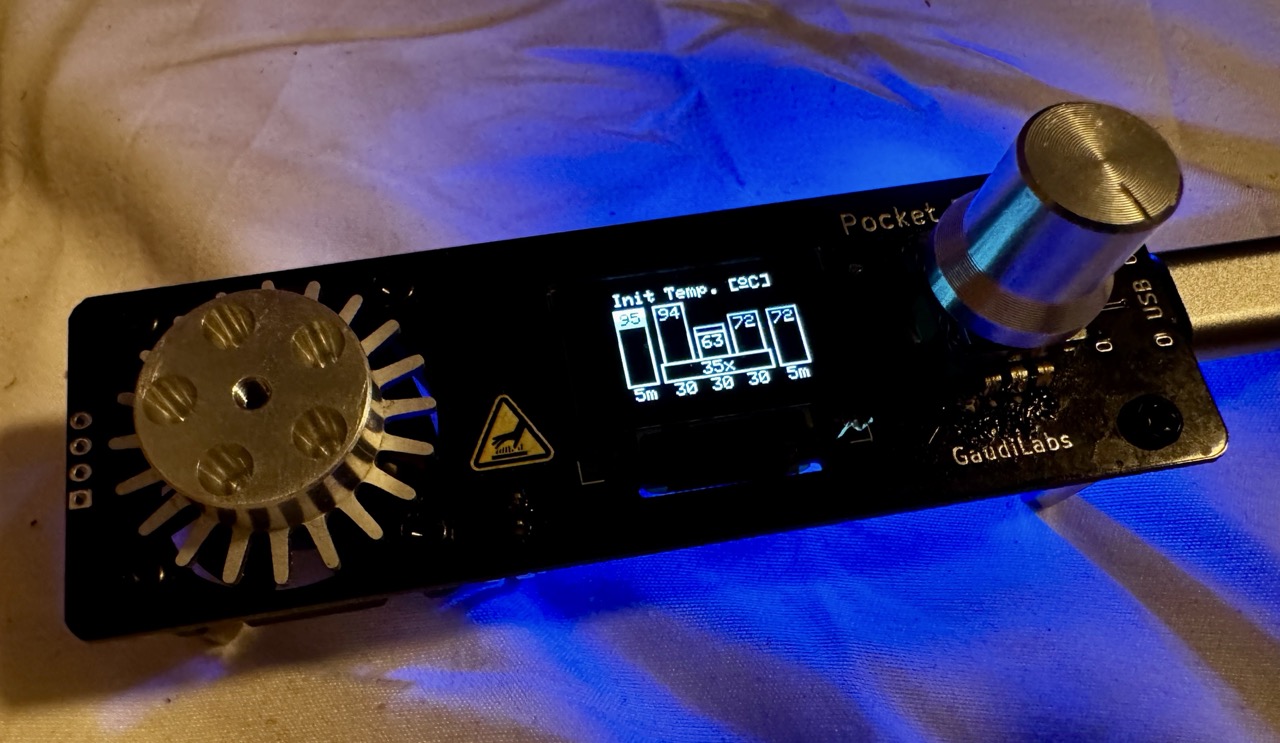
I'll detail a lot of the equipment I made in a future post, but I wanted to talk about a particular device I bought called the PocketPCR, which is a portable thermocycler that can be used for doing PCR reactions. My goal is to build my own thermocycler eventually, but I also didn't want not having one to block months of time I could have spent doing research of my own samples. So I thought as a stop gap measure I would try purchasing the GuadiLab's PocketPCR, which is a 199 Euro mini 5-tube thermocycler.
Assembling It Yourself
If you can handle a bit of soldering, which as an engineer I typically can do, you can save yourself 100 Euro and buy a version of the PocketPCR that needs a bit of assembly. This mostly involves screwing things together and soldering on the rotary encoder. Compared to most things I do like soldering 80 pin chips, this should have been a cake walk. But of course, I got distracted and soldered the encoder on upside down. It took me about ten minutes to desolder it to correct my mistake, but just shows you that mistakes can happen to anybody.
PCR For Dummies (Myself Included)
In case you're new to the world of PCR, let me walk you through how you can start with a small amount of template, say a large amount of blood with a very small virus hiding in it, and amplify it enough to be detectable. This is one of the primary methods used for high sensitivity testing, and was the basis for all those nasal PCR tests we did during the pandemic.
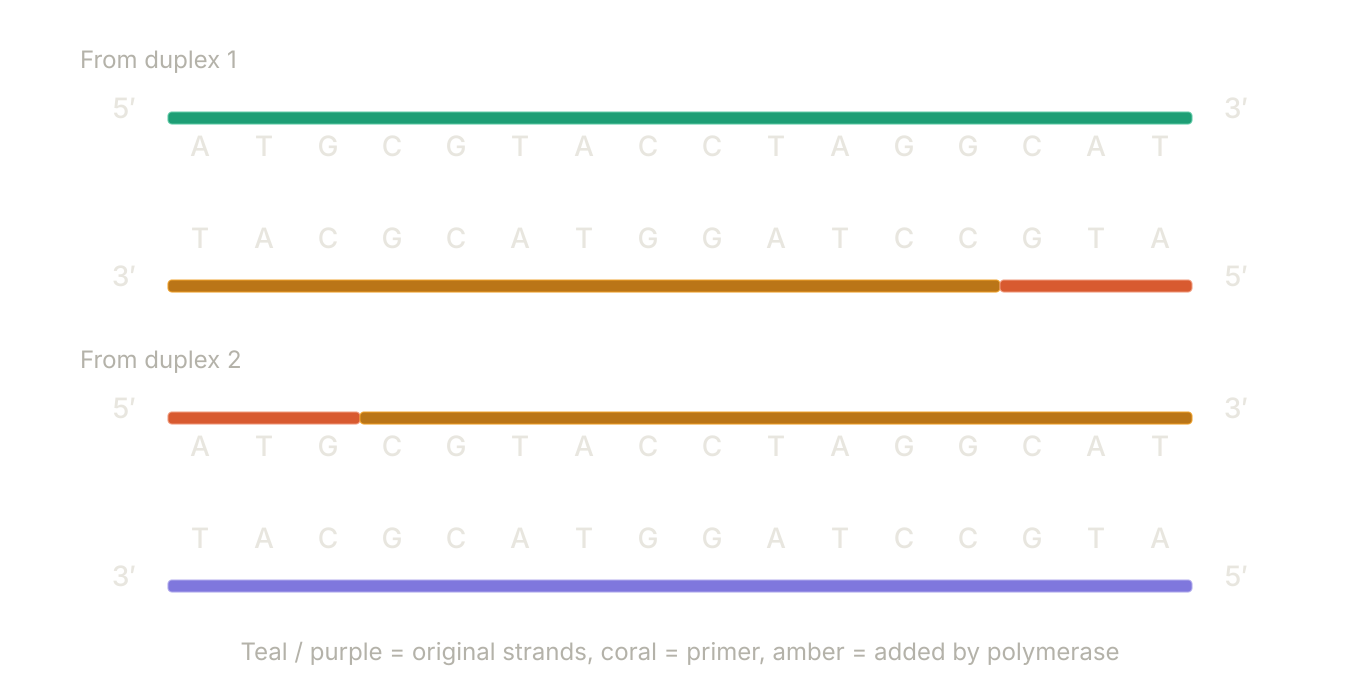
The first step of every cycle is called denaturing. The temperature of the samples, usually cDNA converted from RNA, or DNA from viruses or humans, are raised to about 95C which causes the bonds between the cDNA or the double stranded DNA to split apart. So before you have one double stranded DNA for example, and after denaturing, those strands are split in two, both of which are basically nucleic acid mirror images of each other.
Here is what it looks like.
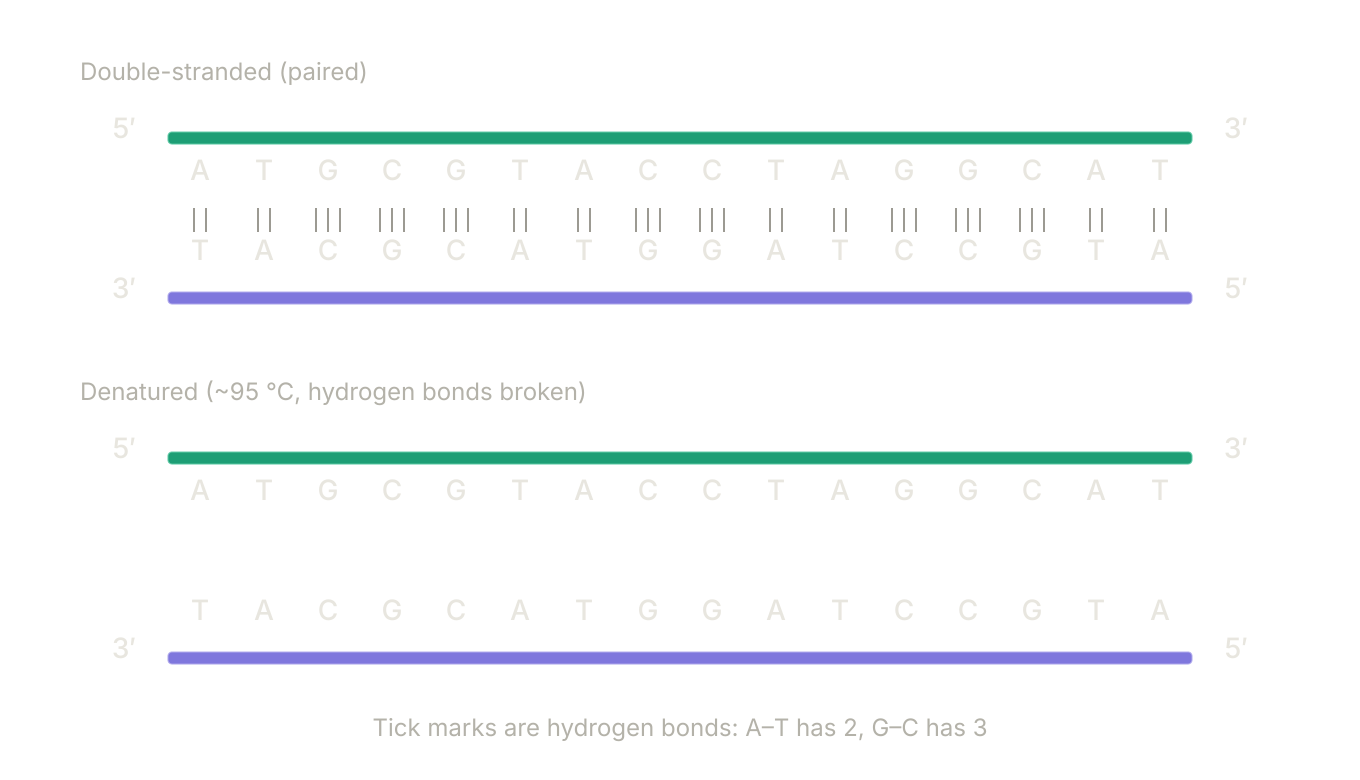
For each reaction, you design two primers, a forward and a reverse one. These primers flank the region of interest, one primer for each strand. Since the strands are complements of each other (each base on the first strand matches a particular base on the second strand), one of the primers is effectively the compliment as well so it binds to the second strand.
For illustrative purposes, I'm using primers that are 3 base pairs long, but they are typically more like 20 base pairs to make it so they are selective and don't just bind lots of other genes.
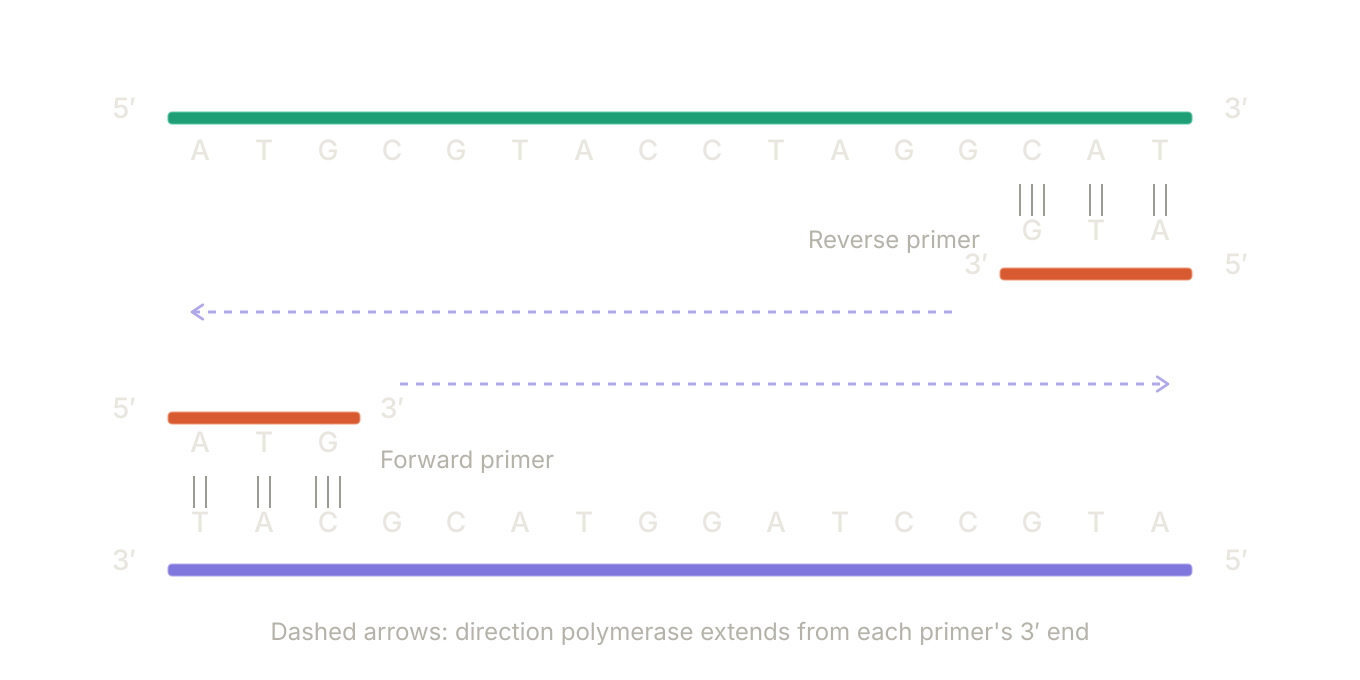
The forward primer, which goes from the 5' end to the 3' end, binds to one strand, and the reverse primer, which goes from the 3' end to the 5' end, binds to the second strand. This step in the PCR reaction is called annealing, and it's temperature dependant. The annealing stage usually lasts for about 30 seconds for each cycle. At this point all the primers in the reaction find their binding spots and lock into place.
After the annealing phase, the temperature is typically raised up to about 72C, which is called the extension phase. At this temperature, an enzyme called DNA polymerase will walk from the 5' side of the primers we added and fill in all the bases using the DNA or cDNA that we denatured as a template to fill in the gaps. This is the nature of how DNA gets copied in the body as well.
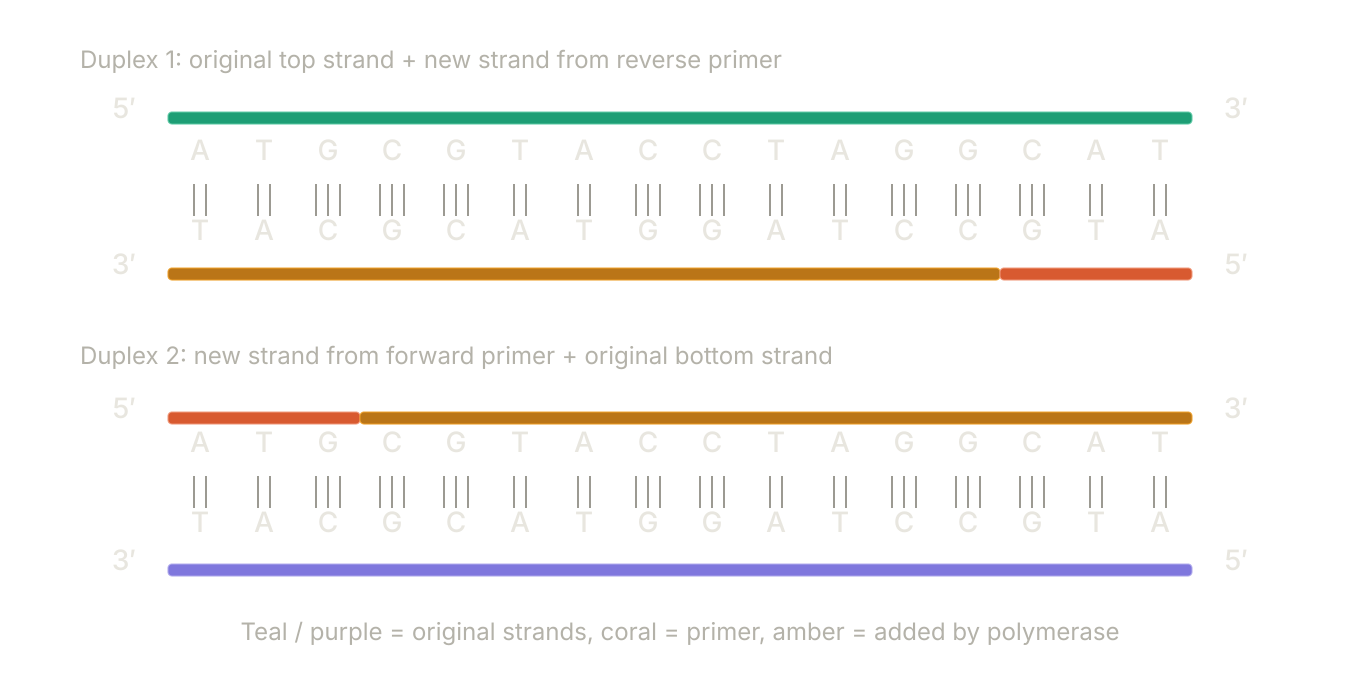
At the end of the cycle, you now have two copies of the same fragment, known as an amplicon, that started from one copy of a template. The next cycle starts with a new denaturing step meant to split these apart.
After denaturing, the two strands we just made and split apart into four strands, and the process begins again, causing roughly exponential growth over each cycle (two becomes four, then eight, then sixteen, and so on).
Of course, the devil is always in the details, and this is a lot of hard work that can and often does go wrong.
Configuring The PCR Parameters
You can see in the image how the cycles are configured using the PocketPCR. I was pleasantly surprised how well the user interface is on this device considering it is so small. But it's relatively easy to set the times and temperatures for each of these PCR stages, and adjust the cycle count. More cycles gives you more amplification, but it also increases the likelihood of off target products as well. At some point as well, usually by cycle 40, you've run out of raw material in the reaction, so you can't make any more copies.
Many commercial thermocyclers include a heated lid. The benefit of that is it prevents condensation from forming inside the tubes, which is a result of some of the reaction buffers themselves evaporating inside the PCR sample tube. To get around this for devices that don't have a heated lid, you can use 20-30uL of mineral oil, which forms a cap on the reaction so nothing can evaporate. That's the method the PocketPCR uses, and it's pretty easy to do and certainly not prohibitive.
Viewing the Results
The standard method for determining whether or not you had any amplification of your product is to run the samples on an agarose gel. This is a small gel matrix that provides resistance to migrating DNA or RNA, which helps separate RNA and DNA of different sizes based on their migration length. Often dyes are added to these gels that glow when they encounter nucleic acids, which allows you to visualize the results of your hard work using a special light - in my case if you shine a blue light onto it, the nucleic acids bound to the dye will absorb the blue energy and re-emit it as green light. So with a proper filter, you can see the green light emitted from the gel, which indicates where the DNA and RNA migrated to.
I made my own gel electrophoresis setup and trans-illuminator, two devices needed for this all to work. I'll detail those in a future post, but the following image was made with both of those.
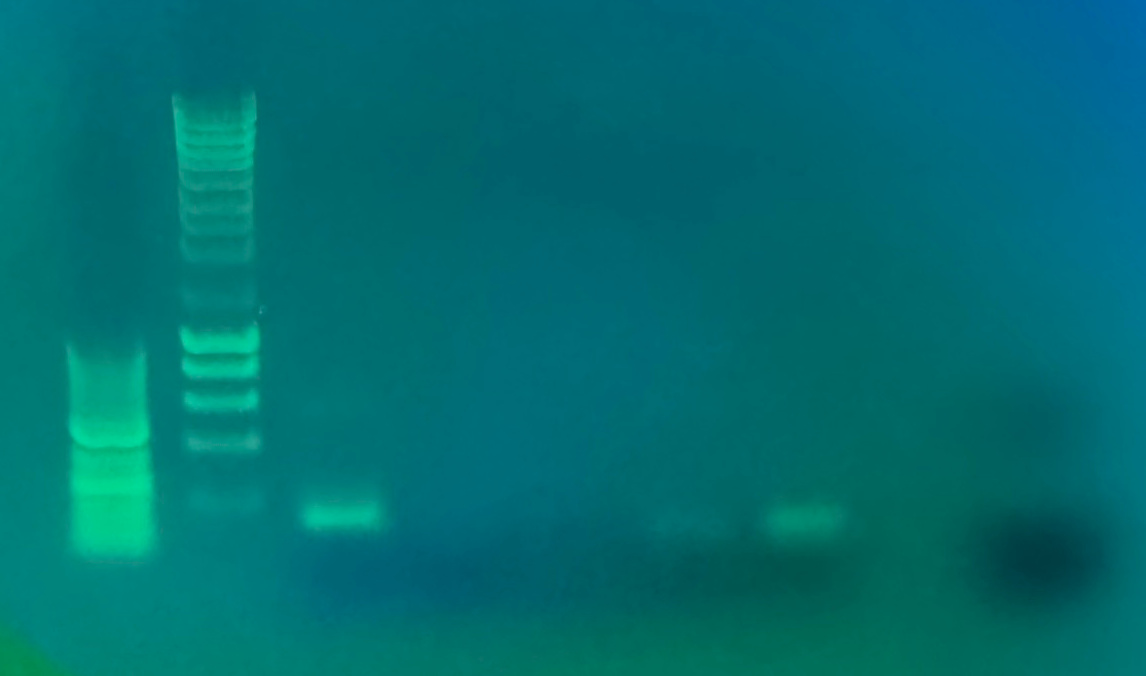
This was an agarose gel I did a few weeks ago. It was an attempt to amplify a common DNA gene called a housekeeping gene, which should in theory always work. Like I said, this is all mostly self-taught, so it's been a real trial and error process. The first two lanes from left to right are what are known as DNA ladders - they are commercial samples that contain various bands with known concentrations and sizes that migrate with a known pattern. As such, you can compare your samples against them on the gel to understand how large they were and how many products were made.
The third lane is what a successful amplicon mostly looks like. It's typically a single bright band between about 100 - 200 base pairs. The image is a bit fuzzy as I still haven't quite dialled in how best to take photos of these, but I'm making progress.
If you look on the far right, there are some dimmer bands that I have struggled with a bit. One of the issues with PCR is that even though you can estimate the temperature at which primers bind to DNA or RNA, it always needs to be confirmed experimentally. When you have a $5,000 thermocycler, often you can do a gradient where you can run 8 samples at the same time, each one using a slightly different annealing temperature. Then, once you image it on a gel, you can see what temperature produced the best looking amplicon, which lets you understand the best temperature to use going forward.
Unfortunately doing a single PCR run on the PocketPCR takes about 1 hour and 45 minutes. So if you were to test 6-7 different annealing temperatures, you're looking at more than a full day of experimentation, and that's just for one set of primers - I have 25 or so. So high end commercial machines do make this part quite a bit easier. If a primer isn't at the optimum temperature, it can produce off products, which are unintended amplifications that generally show up at different molecular weights or as fuzzy patches. Amplifying these off target products is time spent not amplifying your desired amplicon, so they can ruin the results.
You can also get products called primer/dimers, which are when the two primers anneal to each other. These often produce really fuzzy smears around 50-100 base pairs.
First Impressions
For 99 euros, the PocketPCR is a pretty capable device, certainly compared to high end machines. It doesn't have lots of bells and whistles - it can't do gradients, and it can only do five samples at a time, which is a bit limiting. But you get what you pay for, which to be clear is a lot, and for the low price you can just buy a few more to run more than 5 at a time. I just ordered a second one.
The device itself is mostly geared up for doing PCR reactions, even though it can be used to do incubations and even reverse transcription. In both cases, you can simply generate a fake PCR configuration that sets temperatures and durations for a single cycle, for example 25C incubation, 55C reverse transcription, followed by an 85C enzyme deactivation, which is the last profile I used for RNA to cDNA via reverse transcription.
If I had a wish list for the hardware, it would probably be one more well to be honest. Five is a weird number for doing reactions as most tend to run a sample with a control, so you would generally be inclined to run 3 samples with 3 controls, which you can't do. So I tend to always have one tube that isn't really part of my experiment, which isn't ideal. So if I were requesting one hardware change, it would be a slightly bigger block that can accommodate six tubes at a time. I suspect the thermals wouldn't move too much based on my experiments so far.
Open Source
One of the benefits of this device is that it's all open source on Github. I went looking through it all a few weeks ago and found the STL model for the case, which I then printed out at home on my Bambo A1. The PCB designs are included, as well as the Arduino code.
After spending a month playing with this device and understanding all its peculiarities, I decided to have a go at making some software improvements.
What To Improve
Once of the things I noticed while using the PocketPCR is you never really know how long it's going to be cycling. I tend to ballpark it in my head based on the settings and cycles, but I'm usually off by 20 or 30 minutes. For example, I'll come back to see where it's at and see it's on cycle 25 of 35, so I'll go do something else for a while. It doesn't have any connectivity, so there is no real way to know when it's done. A simple speaker might be a neat addition, just to give an audible notice when it's done.
Given the amount of experiments I need to do, I was trying to also find a way to figure out how to better estimate my primer annealing temperatures. I cobbled some code together to estimate it using off the shelf software, and most of my primers were designed to be around 57-60C. But the company where I order them from uses a different formula, and theirs is usually 3-4C lower than mine. So which temperatures should I use? Given a full cycle takes nearly two hours, plus the time taken to run the agarose gel, you're looking at 3-4 hours round trip to figure out if your annealing temperature was wrong.
It turns out there is a pretty clever way to make it so you don't really need to know your primer annealing temperatures, and it's something called Touchdown PCR. After I read it, I realized how smart it was.
Basically as the annealing temperature increases, you'll get more specific binding, but less of it. So your chance of making an off target product is lower, but you'll get less of your desired amplicon with each cycle. The idea behind Touchdown PCR is to start with your annealing temperature about 5 degrees Celsius above what you think it should be. At those higher temperatures, the primer will be very specific, but produce little yield. With each cycle, you nudge the temperature down 0.5 - 1.0C, which causes more primers to bind, but in a less specific way. By the time you get through 5 or 6 cycles, you've given your very specific amplicons several rounds of exponential growth without forming a lot of off products. So in the later rounds, as you continue to lower the temperature, the primers will bind less specifically, but there will be way more valid amplicons from the first cycles to bind to, which chemically makes the generation of your desired amplicon that much more likely from a probability point of view. Unfortunately while Touchdown PCR is a part of many higher end commercial units, it's not part of the PocketPCR.
That is it wasn't, until today.
Custom Firmware
Today I sat down and decided to take a stab at improving the open-source firmware for the PocketPCR. It's all released under the GPL, so I just forked the original one and got to work. My rough goals were:
- Add a dedicated Reverse Transcriptase program that doesn't depend on modifying the PCR program
- Add a proper estimated completion time, that way I know within a few minutes when the PCR would be done. This meant accumulating statistics during the run and using those to refine the estimate
- Add Touchdown PCR to reduce the effect of unknown primer Tms
- Do an automatic cool down of the samples after the PCR - right now they just stay at the last temperature, which for most PCR profiles is the last extension temperature, in my case 72C. So the goal is to get them back close to room temperature after the run.
It turns out the software was written for Arduino, which made it straightforward to modify and flash. I made a backup of the original firmware using the Arduino tools in case my changes borked it, but they didn't.
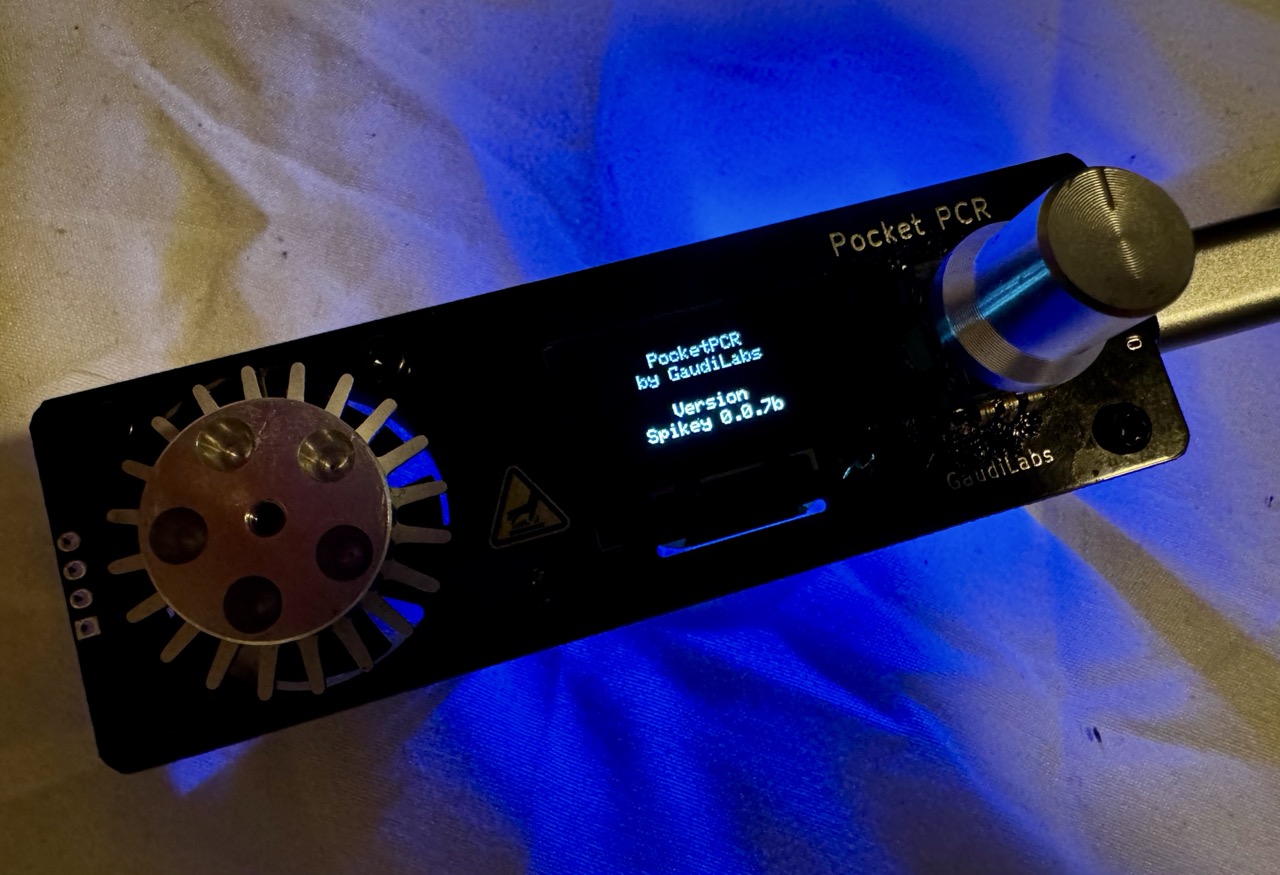
The first thing I added was a new splash screen during startup to show the current firmware, along with a general notice the device is by GaudiLabs. Since most of my efforts revolve around finding spike, I decided to call the firmware Spikey.
I rejiggered the menu options so I could add more configuration options and settings in the future.
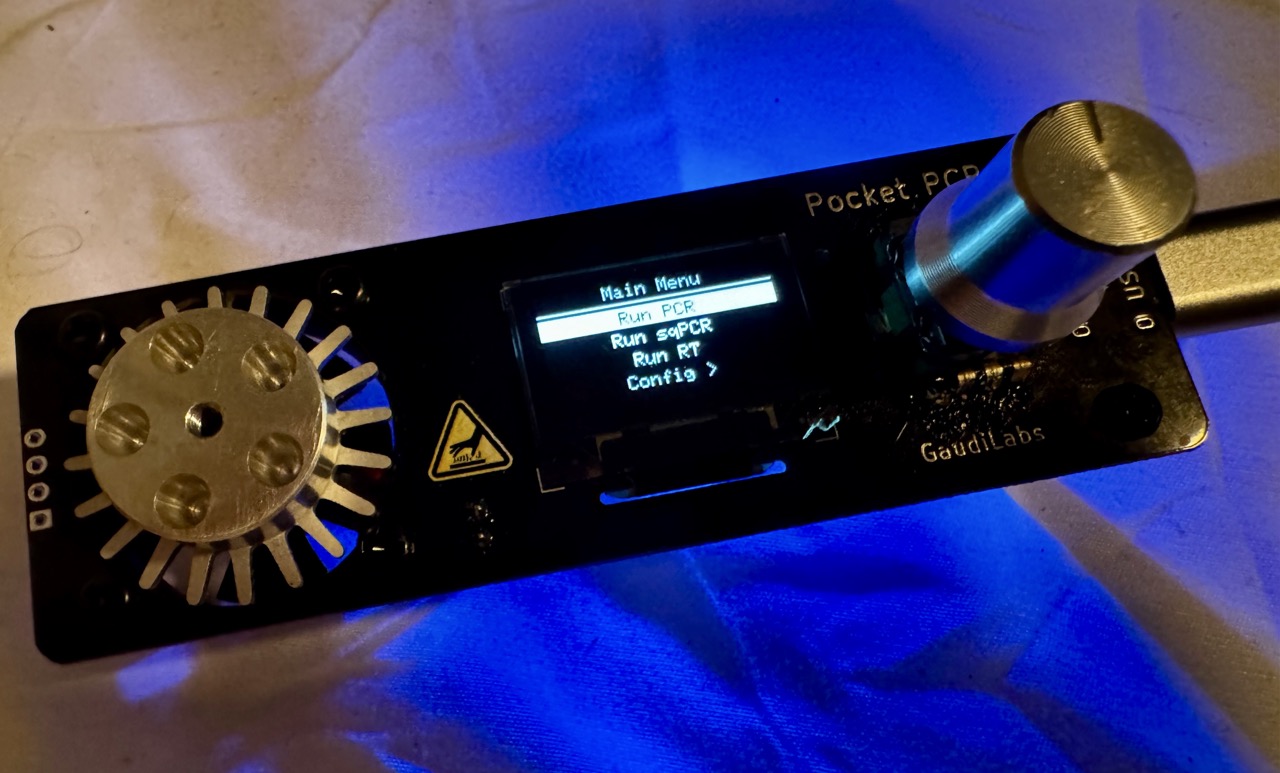
The new main menu is pictured here, showing the new reverse transcriptase (RT) program and a future manual qPCR program I want to try. You can either run the PCR program, or the RT one, and the settings for each are stored separately inside the config menu. I also added a debug section in the config section which shows detailed run statistics for each.
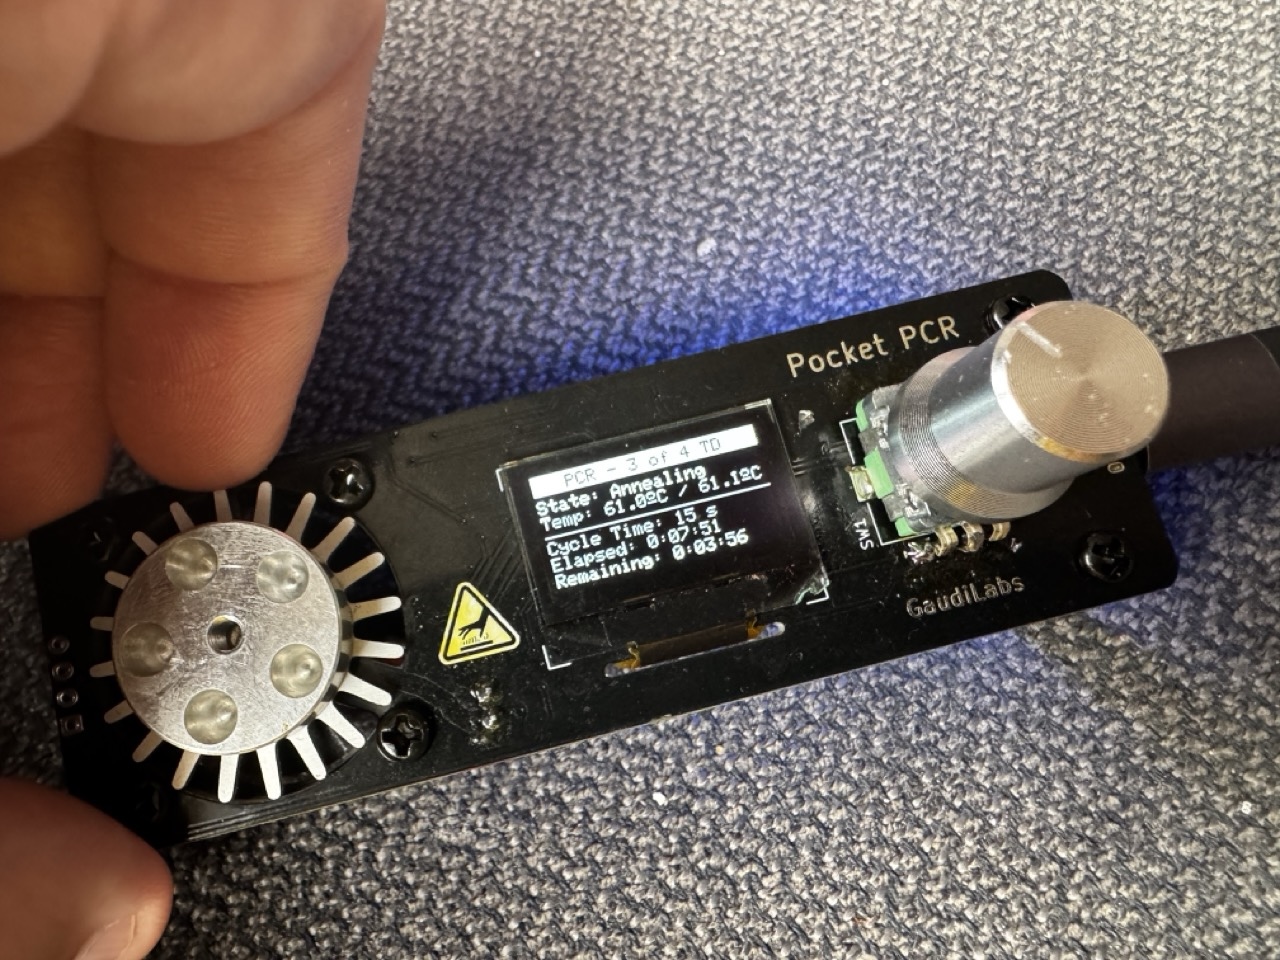
I moved things around on the main progress screen to make better use of the real estate. I then added the estimated completion time, which was about 1% off during my first 35 cycle run - so super accurate.
At the end of every PCR, the entire statistics for that run are now shown in terms of total time, estimated time, and the heating/cooling rates. I plan to experiment with a few different cooling fans, so this lets me understand the impact of changing one out. Shaving 5s off per cycle doesn't seem like a lot, but over 35-40 cycles it adds up.
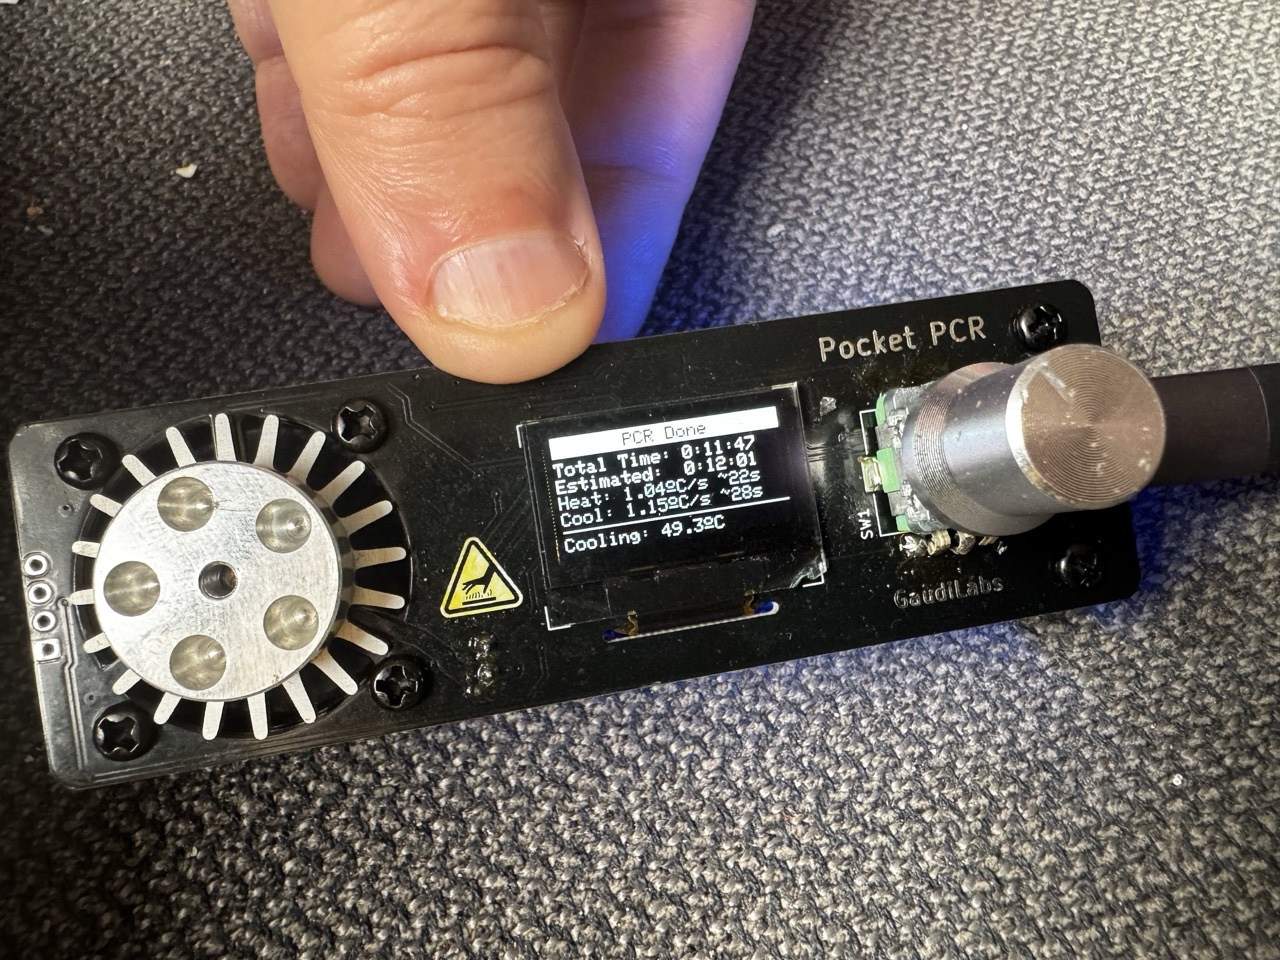
Here is an example of the statistics screen at the very end of the run. As I mentioned before, it now cools the sample down at the end for 60 seconds, which brings it close to room temperature in my case. I'll likely add some configuration options for this shortly. In this case the heating rate was 1.04 Celsius per second, and the cooling rate was 1.15 Celsius per second. Expensive commercial units typically do more like 3-4C/s, but considering PCR used to be done by manually moving samples between water baths at different temperatures, 1C/s is perfectly respectable.
Touchdown PCR
And finally, I added the ability to do Touchdown PCR.
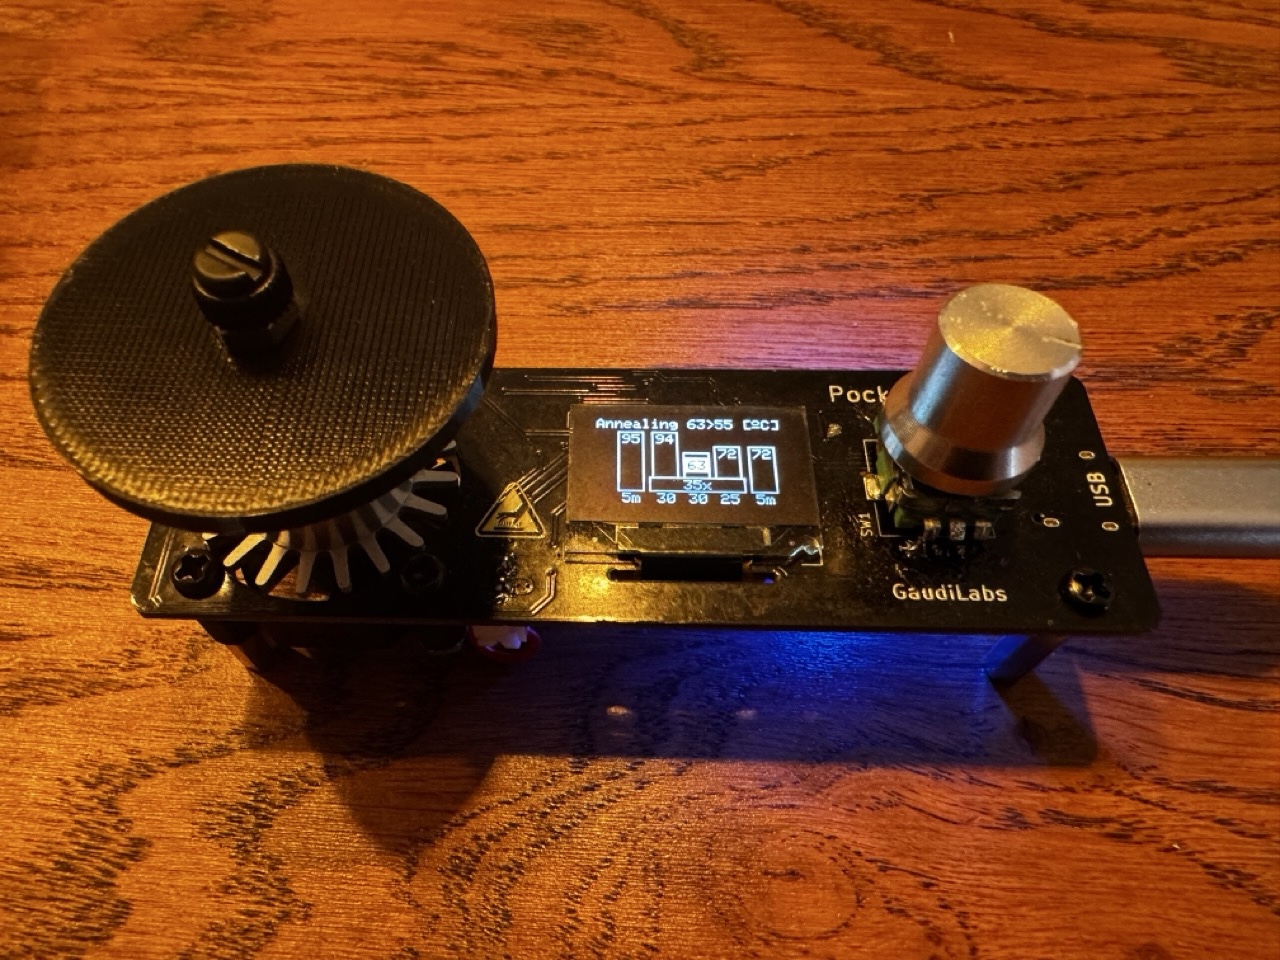
On the configuration screen for the PCR settings, you can basically set a range for the annealing temperature for where to start the annealing at in terms of temperature, and where to end. If they are the same, the behaviour is exactly as it currently is. But if there is a spread, it'll start at the higher temperature and work its way down a degree at a time with each cycle.
Putting It All Together
I pushed out version 1.0.0 of Spikey today, so anyone who is using the PocketPCR is able to use it. I'll likely message the maker of the device and point him at the repo in case he wants to back port any of the changes in - the original code hasn't been updated in six years, so some of it hopefully might be useful.
I did a quick trial of the Touchdown PCR using 35 cycles and taking the annealing temperature from 63C down to 55C. It was then imaged on a 2% agarose gel.
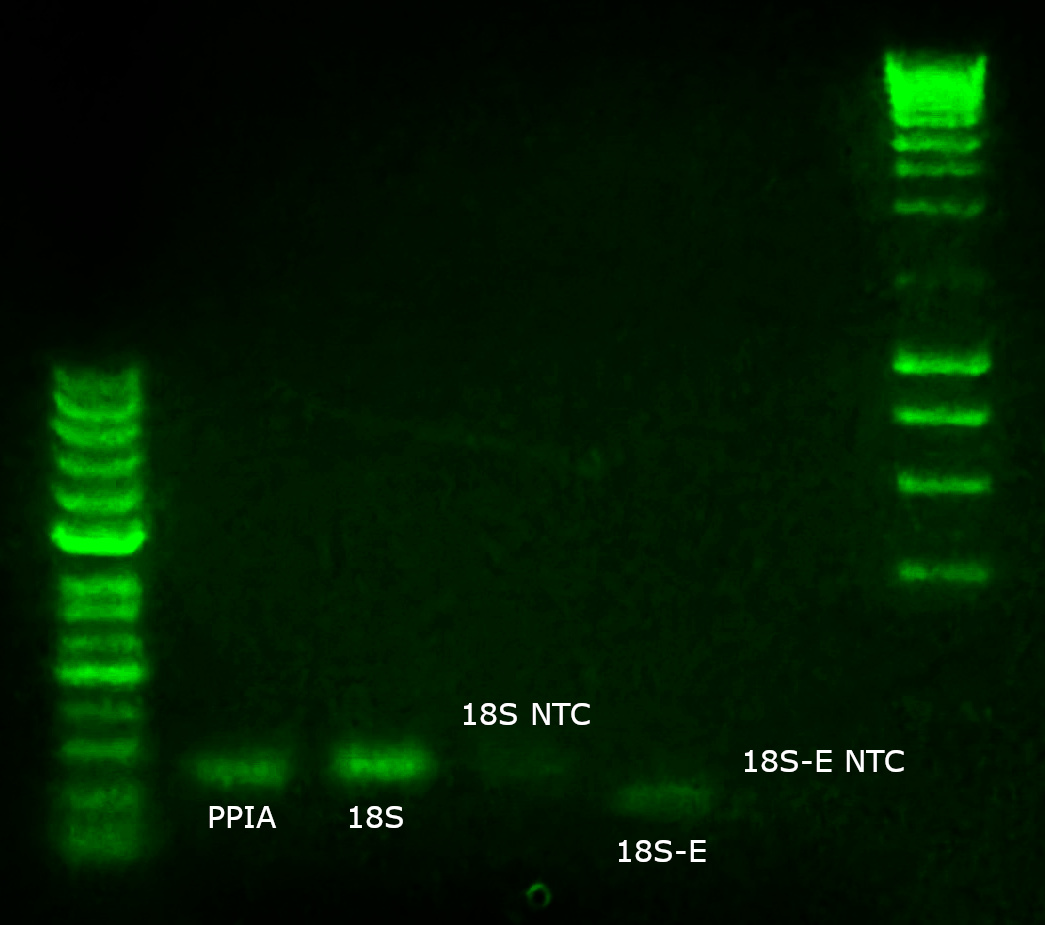
The ladder on the left is a 50 bp DNA ladder and the one on the far right is a 10k bp one. The PPIA formed a proper amplicon at presumably 121 base pairs, which is what it was designed to do. I didn't have room for a NTC (non template control) for this one (hence why six would be better than five in the block :) ), so it was just informative. Next to it is the 18S amplicon and the NTC for that. You can see a small primer/dimer haze in the NTC, but it's not too bad. Next time I'll start at 65C and adjust my primer concentrations and I imagine that will fix that. But the 18S amplicon should be 123 base pair, which seems roughly where it is. The 18S-E amplicon is 96 base pairs, which is also where it ended up.
In general I will probably start a bit higher next time and extend the cycles a bit to compensate for the first 5-10 cycles of the Touchdown. But as a first test it seems to be working, and this was just a quick and dirty trial using some gDNA I hadn't even quantified.
Final Thoughts
For my purposes, the PocketPCR is more than adequate. It took me about 30 days to get used to how it works and to figure out how to fit it into my new workflow. But now I mostly have the hang of it. I'm hoping the changes I made in the firmware help resolve some of the issues I've been having and help me make the best use of the time I do have to play with this, which is often in the evenings.
You can pick up your own PocketPCR from the official GuadiLabs website. If you're looking for my Spikey firmware, head on over to the Spikey Github repository. If you try it out and have any feedback, please drop me a message on X or via my contact info.
Next up for me is to continue my search for Sars-Cov-2 RNA in my own samples. Then I'll sequence it all an hopefully understand my enemy.
Wish me luck.